How to Anchor a Rubber Speed Bump on Asphalt vs Concrete (And Why Bolts Work Loose)
Nearly every complaint we receive about rubber speed bumps turns out to be an anchoring complaint. The rubber is fine. The reflective stripes are fine. What failed is the four bolts holding it to the ground — and once one anchor is loose, the bump starts to rock under every vehicle, which levers out the next anchor, and within a season you have a heavy rubber object skating slowly across a traffic lane.
The reason this keeps happening is that most installers treat asphalt and concrete as the same job. They are not the same job. They are not even the same physics. This guide covers the difference, the hardware that suits each case, the dimensional standards that decide whether you should be fitting a bump at all, and the maintenance step almost nobody does.
1. Why Asphalt Defeats Concrete Anchors
A concrete anchor works by expansion. You drill a hole in a rigid, brittle material, insert a sleeve or a wedge, and tighten. The anchor presses outwards against a hole wall that does not move, and that clamping force is what resists pull-out.
Asphalt does not offer a hole wall that does not move. Asphalt is a visco-elastic composite of aggregate and bitumen binder — it creeps under sustained load and it softens substantially as surface temperature rises. Practitioners put it plainly: asphalt is soft, so lag bolts or anything meant for concrete will not work the same way in it. The expansion force that felt tight during installation slowly deforms the surrounding material until the anchor is simply sitting in an oversized hole.
The correct approach on asphalt reverses the mechanism. Instead of pushing outward against a short rigid hole, you use a long spike or a long lag fastener and rely on friction and mechanical interlock along the entire shaft. Depth substitutes for clamping force. Industry installation guidance for speed bumps is consistent on the pairing: spikes are recommended for asphalt, while bolts with shields are recommended for concrete.
2. Hardware Selection by Substrate
| Substrate | Recommended fastener | Mechanism | Common mistake |
|---|---|---|---|
| Sound concrete | Lag bolt with expansion shield, or wedge anchor | Expansion against a rigid hole wall | Drilling shallower than the manufacturer's stated depth |
| Asphalt (cured) | Long spike — typically 6 in or longer | Shaft friction and mechanical interlock over depth | Re-using the concrete kit that came in the box |
| Fresh asphalt | Wait. Do not anchor. | — | Installing on the same day as paving |
| Thin asphalt over weak base | Core through to the base, or relocate | — | Assuming any anchor can fix a bad base |
Two practical notes. First, a kit that ships "in the box" is usually specified for one substrate only — check which one before you send a crew out, because discovering it on site costs a return trip. Second, when a hole has already been over-drilled or has worked loose, the honest fix is to move to a larger-diameter fastener or relocate the hole. Filling a slack hole and re-using the same bolt buys you weeks, not years.
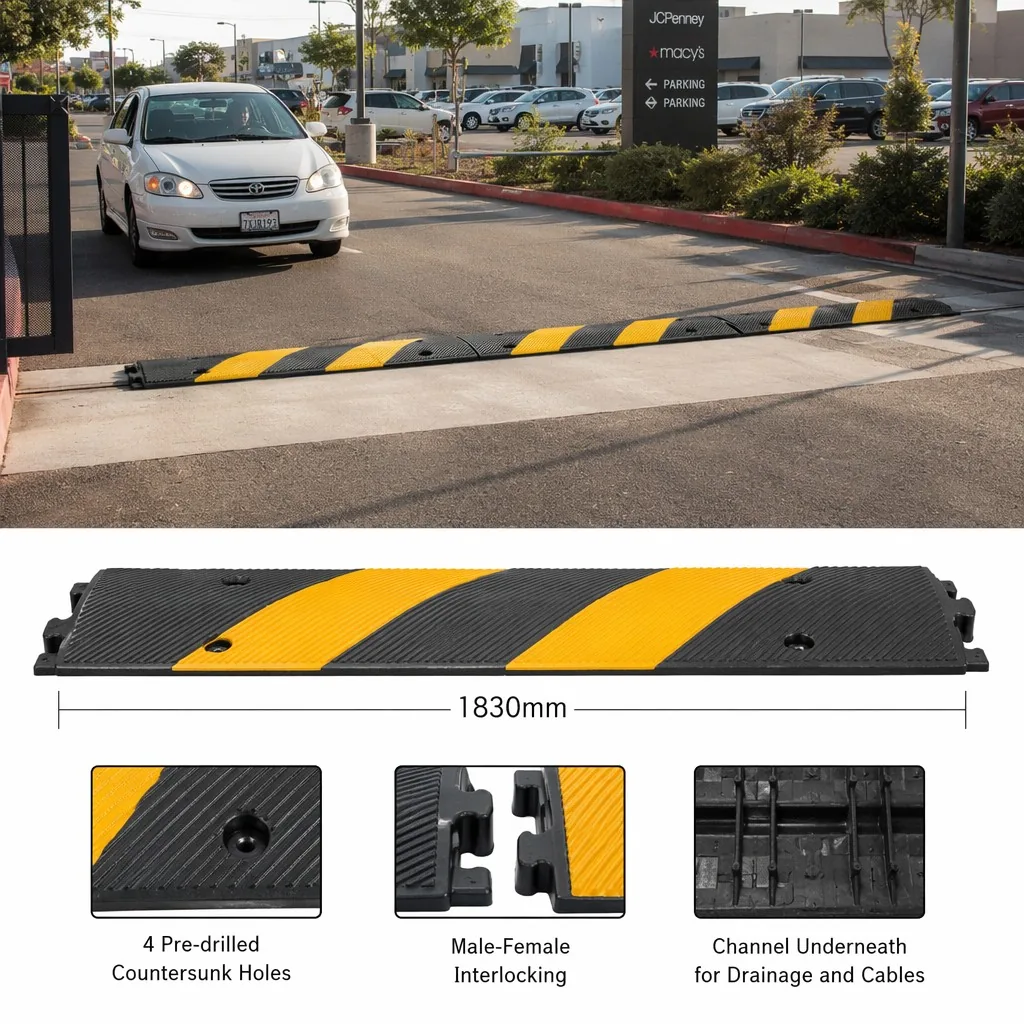
1830mm Outdoor Modular Rubber Speed Bump
Snap 3+ sections into any lane width · interlocking male/female ends with no gap · 4 × Ø14 mm countersunk anchor holes per section · bottom drainage channel · black-and-yellow reflective stripes.
View specifications & request a quote →3. Countersinking Is a Safety Feature, Not a Finish
A bolt head standing proud of a speed bump's top surface is struck by every tyre that crosses it. Three things follow. The head takes repeated impact and eventually the fastener fatigues or backs out. The exposed head becomes a snag point for pedestrians, cyclists and shopping trolleys. And any coating on the head is destroyed within weeks, so corrosion starts.
This is the same failure pattern that turns weathered concrete parking blocks into liability cases: a metal fixing that ends up higher than the surface it was supposed to sit inside. We cover that mechanism in detail in our wheel stop specification and liability guide, and the lesson transfers directly. Specify countersunk recesses deep enough that the head finishes below the rubber surface, and check on site that the installer actually seated them.
4. Speed Bump or Speed Hump? Get This Right First
The terms are used interchangeably in catalogues and are not interchangeable in engineering.
- Speed hump — a road-engineering feature built into the pavement. ITE guidance describes a hump around 12 feet long in the direction of travel and about 3 inches high. NACTO's guidance gives 3 to 4 inches high and 12 to 14 feet wide, with a ramp length of 3 to 6 feet depending on target speed, reducing speeds to roughly 15 to 20 mph.
- Speed bump — a much shorter device, usually a bolt-down rubber or plastic unit, producing a sharp vertical jolt. Appropriate for parking lots, private estates, service yards and campus roads where the intended crossing speed is very low.
Fitting a short bump where a hump belongs is the most common and most expensive mistake in traffic calming. On a through-road where drivers arrive at 30 mph, a short bump does not calm traffic — it damages suspension, generates noise complaints from adjacent residents, and gets torn out within a year. If the road carries real speed, you need a hump profile, and that is a paving job rather than a bolt-down product.
5. Drainage — The Detail That Decides Where Water Goes
A speed bump laid across a lane is a dam. Whatever runs down that lane now has to get through, under or around a continuous rubber wall.
If it cannot, three things happen. Water ponds on the uphill side, which freezes in winter and creates an ice sheet exactly where drivers are braking. Grit and silt accumulate against the bump, holding moisture against the pavement and accelerating its breakdown. And in a lot where cable runs or hose lines cross the same route, the pooling saturates them.
The fix is a bump with a drainage channel moulded into the underside so water passes beneath rather than around. Confirm on site that the channel is aligned with the direction of fall, not across it — a drainage channel installed perpendicular to the flow is decoration.
6. Modularity: Why Section Length Matters
A one-piece bump sized for a specific lane is convenient exactly once. Modular sections that interlock give you three things a monolithic unit cannot:
- Any lane width. Add or remove sections rather than re-ordering the whole assembly.
- Cheap repair. When one section is damaged by a snow plough or a delivery truck, you replace one section, not thirty feet of bump.
- Shipping economics. Sections stack on a pallet. A single long unit does not, and the freight cost on an awkward one-piece item frequently exceeds the product cost.
The detail to check is the joint. Male/female interlocking ends should close with no gap; a butt joint between two flat ends opens up as soon as the sections settle differently, and the gap becomes a snag point and a debris trap.
7. Installation Sequence That Actually Holds
- [ ] Confirm substrate — asphalt or concrete — and match the fastener kit before dispatch
- [ ] Confirm the asphalt is fully cured; never install on a fresh mat
- [ ] Dry-lay the sections, mark the holes through the bump itself, not from a drawing
- [ ] Check the drainage channel runs with the direction of fall
- [ ] Drill to the manufacturer's stated depth — not to the length of the drill bit you brought
- [ ] Blow out all dust from the hole before setting any anchor
- [ ] Seat every fastener into its countersunk recess, flush or below
- [ ] Verify all interlocking joints have closed with no gap
- [ ] Re-torque every fastener after the first hot season, then annually
- [ ] Keep spare sections in stock — a partially removed bump is worse than none
8. What Happens If You Skip the Re-Torque
The re-torque is the cheapest line on that list and the one that gets dropped. It matters because the first summer is when the asphalt around each anchor reaches its highest temperature and lowest stiffness, and it is when the installation settles into its long-term position. A ten-minute pass with a socket wrench at the end of the first hot season catches every anchor that has moved while it is still recoverable.
Miss it, and the failure sequence is predictable: one anchor loosens, the section rocks, the rocking transfers load onto the adjacent anchors, and the loose fastener starts to rise above the rubber surface. Motorists have documented the consequences of loose fixings on damaged road humps — including undercarriage protection panels being torn open by a bolt that was no longer where it belonged. That is a claim from a maintenance task that would have taken ten minutes.
Frequently Asked Questions
Why do speed bump bolts keep working loose on asphalt?
Concrete anchors work by expanding against the wall of a rigid hole. Asphalt is visco-elastic: it creeps under sustained load and softens in summer heat, so the hole deforms and the expansion force bleeds away. The usual answer is a long spike that relies on friction along its whole shaft rather than an expansion anchor that relies on a rigid hole.
What is the difference between a speed bump and a speed hump?
A speed hump is a road-engineering feature. ITE guidance describes a hump roughly 12 feet long in the direction of travel and about 3 inches high, and NACTO describes humps 3 to 4 inches high and 12 to 14 feet wide, bringing traffic down to about 15 to 20 mph. A speed bump is much shorter front-to-back, produces a sharper jolt and is intended for parking lots and private roads at very low speed.
Can a speed bump be installed on freshly laid asphalt?
No. A new asphalt mat is still curing and is at its softest. Anchors driven into it will loosen during the first thermal cycle. Wait for the mat to cure as specified by the paving contractor, and re-torque all fixings after the first hot season regardless of substrate.
Get the Substrate Question Answered Before You Order
When you request a quote for speed bumps, the single most useful sentence you can include is which surface they are going onto. It changes the anchor kit, it changes how many anchor points you want per section, and on asphalt it changes whether we recommend a bump at all versus a longer, gentler profile.
Tiantai Minjun moulds modular rubber speed bumps in Tiantai County, Zhejiang, and ships factory-direct. Tell us the lane width, the substrate and the destination climate, and we will quote the correct number of sections and the matching fastener kit rather than a bare unit price.